Konichiwa, minaasan! (or Hello, everyone!)
I'm taking my 3rd semester of Japanese at Baylor, and thought I'd share a fun little assignment I did today with everyone. My Sensei had us all create a Voki introduction for ourselves in Japanese. Voki's are little animated avatars you can make talk by either typing in a message or recording your voice. Try it out, it's really fun!
Here's my Voki Japanese Introduction!
Friday, August 28, 2009
Monday, August 24, 2009
New Geisha Doll Project
Another day, another craft. ^_^
I have been diligently working on my newest geisha paper doll creation, my second to feature an accessorized doll with accompanying scenery. She isn't finished yet, but I thought I'd give everyone a sneak peak at her and a small glimpse at the process of making her thus far.
 Unfortunately, I wasn't thinking and didn't take pictures from the beginning, BUT you will get to see how I make all of the accessories and scenery for this piece.
This is the doll itself, before I added her obi sash. She was given an ornate bow obi made from ivory embossed paper, and then was added to a rectangular black wood base. The scenery will then be added to the base to complete the display.
 I knew I wanted my doll to be holding a parasol, and I had originally planned on just buying some little drink umbrellas. When I looked at them though, none of them suited my color scheme, so this is me making my own, lol.
I used a decorative toothpick (it has decorative carving at one end, as opposed to being pointy at both ends) and a piece of floral scrolled vellum cut into a small circle. I cut a small wedge from the circle so that it would form a shallow-sided cone, and poked a hole in the center. I then pushed the toothpick through, pointy end first. A little Tacky glue to the underside, and I had myself an umbrella! The pic shows me adding shimmery white sequins to the edge for embellishment. (What it doesn't show is me cursing at how delicate and tiny it all is, or my boyfriend glaring at me for sticking a toothpick in his candle, lol.)
 Here's the doll on her base, with the obi sash and umbrella added.

And here's the doll with a spool of thread for size reference. TINY!
I hope you enjoyed this little preview of my latest doll, and I will update soon with a post on how I make the scenery and photos of the process and the completed doll!
And as always, Happy Crafting!
~TPE
I have been diligently working on my newest geisha paper doll creation, my second to feature an accessorized doll with accompanying scenery. She isn't finished yet, but I thought I'd give everyone a sneak peak at her and a small glimpse at the process of making her thus far.
 Unfortunately, I wasn't thinking and didn't take pictures from the beginning, BUT you will get to see how I make all of the accessories and scenery for this piece.
This is the doll itself, before I added her obi sash. She was given an ornate bow obi made from ivory embossed paper, and then was added to a rectangular black wood base. The scenery will then be added to the base to complete the display.
 I knew I wanted my doll to be holding a parasol, and I had originally planned on just buying some little drink umbrellas. When I looked at them though, none of them suited my color scheme, so this is me making my own, lol.
I used a decorative toothpick (it has decorative carving at one end, as opposed to being pointy at both ends) and a piece of floral scrolled vellum cut into a small circle. I cut a small wedge from the circle so that it would form a shallow-sided cone, and poked a hole in the center. I then pushed the toothpick through, pointy end first. A little Tacky glue to the underside, and I had myself an umbrella! The pic shows me adding shimmery white sequins to the edge for embellishment. (What it doesn't show is me cursing at how delicate and tiny it all is, or my boyfriend glaring at me for sticking a toothpick in his candle, lol.)
 Here's the doll on her base, with the obi sash and umbrella added.
And here's the doll with a spool of thread for size reference. TINY!
I hope you enjoyed this little preview of my latest doll, and I will update soon with a post on how I make the scenery and photos of the process and the completed doll!
And as always, Happy Crafting!
~TPE
It's Back To School...and a Weekly Feature!
Whew! It's been a busy week!
I moved back into my dorm yesterday and classes start tomorrow, so there was a lot to be done. Thankfully, my amazing boyfriend came down to help me out, making the whole process so much less stressful, and I'm finally getting stuff ironed out and organized.
I'm really excited about this new semester! My roommates are awesome and I've really been finding myself over the summer, and am in a really good place right now. It's going to be a great year, I know it. ^_^
And, in light of my excitement over this new school year, I have decided to do a weekly feature on BACK TO SCHOOL! Everything you need to be a good student...and look good doing it. ^_~
 First, we have this hilarious pin by beanforest. I love it! Add it to a bag, or for 50cents extra, make it a magnet!
 Next, we have this seriously cute tote by HautTote. She has some great bags in her shop, and even has matching pencil cases! I love her anime pin-up girl series, but she has many other styles to choose from. Carry those overpriced textbooks in style!
 Next, there's these awesome pencil cases from VioletGiftShop! I really love these. So simple, yet utterly adorable! These make wonderful additions to your bag or purse. You can even use them for your tampons....
 Why not carry your lunch is style with this authentic Japanese bento box set? Keep all your munchies safe and seperated in this coordinated 6 piece set from spacestitch.
 Keep track of your important information, of just jot down notes in this BEAUTIFUL handbound journal by bindingbee. Check out her shop, full of other great journals!
 How about these adorable retro apple bulletin boards by pegsboards? Perfect for brightening up your appartment or dorm. Keep track of notes, buisness cards, photos, or just hang as is for a great piece of art. She also makes wonderful push pins to add to her boards! ^_^
 Craving some color on those drab dorm walls but can't paint them? How about vinyl decals? They're completely removable and won't hurt your walls! Have the style you want!
This cute little bird cage decal is by HouseHoldWords. Customizable, you can order different colors and sizes to make it perfect for your space, and her great prices make it brilliant!
 Be brainy with this CUSTOM laptop sleeve from brokesy. Since it's custom, you are guarenteed a good fit, and the her designs are totally unique and quirky. Perfect for the geek in your life!
 Keep that all important flash drive safe and handy with this cute little flash drive holder and key ring from auntifranni. Lots more in her shop, so your sure to find the perfect one to fit your style. <3
 And last, but certainly not least, we have this reclaimed vintage record wall clock by TickTocklers! Get to your classes on time and be stylish doing it. ^_^
Thanks to all the wonderful Etsysians who make my weekly features possible! Please give them some love!
And as always, Happy Crafting!
~TPE
I moved back into my dorm yesterday and classes start tomorrow, so there was a lot to be done. Thankfully, my amazing boyfriend came down to help me out, making the whole process so much less stressful, and I'm finally getting stuff ironed out and organized.
I'm really excited about this new semester! My roommates are awesome and I've really been finding myself over the summer, and am in a really good place right now. It's going to be a great year, I know it. ^_^
And, in light of my excitement over this new school year, I have decided to do a weekly feature on BACK TO SCHOOL! Everything you need to be a good student...and look good doing it. ^_~
First, we have this hilarious pin by beanforest. I love it! Add it to a bag, or for 50cents extra, make it a magnet!Next, we have this seriously cute tote by HautTote. She has some great bags in her shop, and even has matching pencil cases! I love her anime pin-up girl series, but she has many other styles to choose from. Carry those overpriced textbooks in style!Next, there's these awesome pencil cases from VioletGiftShop! I really love these. So simple, yet utterly adorable! These make wonderful additions to your bag or purse. You can even use them for your tampons.... Why not carry your lunch is style with this authentic Japanese bento box set? Keep all your munchies safe and seperated in this coordinated 6 piece set from spacestitch.Keep track of your important information, of just jot down notes in this BEAUTIFUL handbound journal by bindingbee. Check out her shop, full of other great journals!How about these adorable retro apple bulletin boards by pegsboards? Perfect for brightening up your appartment or dorm. Keep track of notes, buisness cards, photos, or just hang as is for a great piece of art. She also makes wonderful push pins to add to her boards! ^_^Craving some color on those drab dorm walls but can't paint them? How about vinyl decals? They're completely removable and won't hurt your walls! Have the style you want!
This cute little bird cage decal is by HouseHoldWords. Customizable, you can order different colors and sizes to make it perfect for your space, and her great prices make it brilliant!
Be brainy with this CUSTOM laptop sleeve from brokesy. Since it's custom, you are guarenteed a good fit, and the her designs are totally unique and quirky. Perfect for the geek in your life!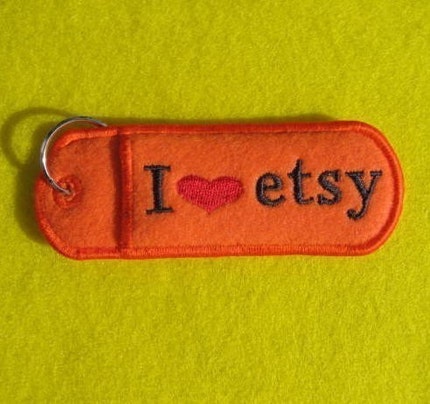 Keep that all important flash drive safe and handy with this cute little flash drive holder and key ring from auntifranni. Lots more in her shop, so your sure to find the perfect one to fit your style. <3And last, but certainly not least, we have this reclaimed vintage record wall clock by TickTocklers! Get to your classes on time and be stylish doing it. ^_^
Thanks to all the wonderful Etsysians who make my weekly features possible! Please give them some love!
And as always, Happy Crafting!
~TPE
Friday, August 21, 2009
I lost my Trade Virginity!!!
Well, I suppose this is yet another case of virginity lost through peer pressure. I was chatting with a friend via MSN messenger and one thing just lead to another. Soon, we were talking Etsy and sales, and well...I guess the inevitable came up.
Trading.
Well, I had never traded before, but she assured me there was nothing to worry about. It was nothing. Everyone was doing it. There was even a forum thread, group and BLOG for it. Well, if it had a blog....
So there I was, tremulously typing 'tradeaholic' into the forum search box on Etsy. I closed my eyes, and hit Enter and up popped the Tradeaholic's 18 hour Frenzy thread.
Wait, FRENZY?! What was i getting myself into? And yet, I was compelled.
Before I knew it, I had entered the thread and posted, opening myself up for trades. And did they ever come.
I had only barely just posted, and my Conversation lit up! Oh, I was hooked! The thrill of seeing those red little numbers at the top of my screen! I couldn't wait to read them all! I could barely keep up, they just kept coming! To think people wanted to trade with a newbie like me, that they liked my shop! So new to this trading thing, and already an addict, already a.....tradeaholic.
-------------------------------------------------------------------------------------------------
In all seriousness, trading is WORTH IT!
- Great way to see other seller's shops
- Great way to be seen!
- Wonderful way to get your products circulating
- Word of mouth gets around, impress those traders!
- Meet cool sellers and NETWORK!
- Great way to get some Holiday gifts for us starving artists
- Great way to get supplies. Lots of destashers wanting to trade!
Saturday, August 15, 2009
This week's feature: Steampunk Wedding!
Well, I've been a neglectful little blogger, haven't I? Life's been rather nebulous lately, with heading back to school and moving and getting my things together, but at least I remembered weekly feature, right?...right?
Well, to (hopefully) make up for my neglect, I have put together a very special feature for everyone. Enjoy!
-------------------------------------------------------------------------------------------------
Ever since my boyfriend and I began discussing marriage, I've all but had the event planned, lol.Of course, these plans are frequently revised, mostly on account of Etsy.
I knew I wanted something different, as both me and my boyfriend aren't traditional in any since of the word, and I knew Etsy was definitely the place to start looking. While searching , I came across some amazingly unique options for the vintage/gothic-minded Bride, and developed quite a collection of tagged items. I've been tryign to put them into a treasury, but every Etsyian knows how hard that is, so for now, I'll feature some of my favorites. ^_^
Please take a look at my sidebar and the amazing wedding items featured there. These shops are GORGEOUS and it was very hard to pick only one item from each. Check them out, you won't be dissapointed!
Thanks to all the wonderful Etsyians who make my features possible, and as always,
Happy Crafting!
~TPE
Saturday, August 8, 2009
This week's feature: Plushies!
 This week's feature was inspired by a wonderful, random act of kindness from my Dear Boyfriend. I had been having a really bad day, so on his way home from work, he stopped and got me a present. ^_^
It turned out to be an utterly adorable Uglydoll. If you haven't checked these out before, you really must! They're so cute and VERY SOFT! I'm sure I'll have the whole collection before long, lol.
At any rate, this thoughtful gift amde me crave a little plush in my life, so I hit Etsy searching for stuffies for my next weekly feature. Please check out my side banner for all the wonderful stuff (pun so intended!).
As always, thank you to the wonderful Etsy-sians whose awesome items make my weekly feature possible. Please give them a look. ^_^
~TPE
Wednesday, August 5, 2009
Buisness Cards on Display
With the date of my first craft show drawing closer, I've been looking all over the net for new and creative ways to display and promote, and today, I found some great ways to show off those all important business cards.
All of these are DIY holders that are simple and use materials you probably already have lying around the house. ^_^
 First, I have a really cool DIY holder made from yellow pages and a tube. The original maker uses metal tubes for a more mod look, but you could make a tube from colored cardstock, or decorate a toilet paper tube for even more recycling goodness! You can find how to make it here.
 Next is a great way to recycle those old cassete tape cases. Use the cassete as a holder and the cassete case as a display stand, perfectly portable! You could leave them plain or embellish them using hot glue or a strong glue like E600. Find the tutorial here.
 The next one is for all of you out there who like to steal paint samples when you go to the hardware store. Don't deny it, you know you do it, too. Come on, I can't be the only one....right?
This project is a great way to use up all those paint chips and makes a colorful display for your buisness cards. You could even add some embellishment to personalize. Easy peasy! Here's the tutorial.

The next one is a really beautiful way to display, and you could really use any paper you desire. I find using old cereal boxes for the base is a great way to recycle. ^_^ You can find the template and instructions here.
 I also found a buisness card box template that could also be made from cereal boxes and scrapbook or washi paper. you could even use wrapping paper.
The last one is probably one of my favorite ideas; this mini easel is totally adorable and so easy to make. All you need is a few Popsicle sticks, cardboard and glue! Not as portable as the others, but still a cute, unique way to display those business cards at your booth or on your desk. ^_^
You can view pictures and the tutorial here.
Hope you all have fun making your very own business card holders, and as always,
Happy crafting!
~TPE
All of these are DIY holders that are simple and use materials you probably already have lying around the house. ^_^
 First, I have a really cool DIY holder made from yellow pages and a tube. The original maker uses metal tubes for a more mod look, but you could make a tube from colored cardstock, or decorate a toilet paper tube for even more recycling goodness! You can find how to make it here.
 Next is a great way to recycle those old cassete tape cases. Use the cassete as a holder and the cassete case as a display stand, perfectly portable! You could leave them plain or embellish them using hot glue or a strong glue like E600. Find the tutorial here.
 The next one is for all of you out there who like to steal paint samples when you go to the hardware store. Don't deny it, you know you do it, too. Come on, I can't be the only one....right?
This project is a great way to use up all those paint chips and makes a colorful display for your buisness cards. You could even add some embellishment to personalize. Easy peasy! Here's the tutorial.
The next one is a really beautiful way to display, and you could really use any paper you desire. I find using old cereal boxes for the base is a great way to recycle. ^_^ You can find the template and instructions here.
 I also found a buisness card box template that could also be made from cereal boxes and scrapbook or washi paper. you could even use wrapping paper.
The last one is probably one of my favorite ideas; this mini easel is totally adorable and so easy to make. All you need is a few Popsicle sticks, cardboard and glue! Not as portable as the others, but still a cute, unique way to display those business cards at your booth or on your desk. ^_^
You can view pictures and the tutorial here.
Hope you all have fun making your very own business card holders, and as always,
Happy crafting!
~TPE
Tuesday, August 4, 2009
Crafting For A Cause
In this hard time, we're all feeling the pinch. Sales are low and every dollar has to be stretched a little further. In these times, it's hard to remember those who are less fortunate, and because of this, everyone's hurting a little more than usual. And yet, my good Etsy friend looked past her own needs and created a 100% charity Etsy shop!
JollyJennifer just recently created crafting4causes, an Etsy shop that relies on item donations from fellow artists and Etsy-sians and then takes 100% of the procedes and donates them to a given charity.
Every couple of months, the charity to be donated to will change, making sure that the good will gets passed around. For the month of August, the charity will benefit her local food bank.
I was privileged enough to be asked to be one of her contributing sellers and just shipped away several donations for her shop. She plans to add many more items in the weeks to come, and her shop promises to have tons of variety. Already, she has been given a stuffed kitty, several tote bags, some tags and odds and ends, and I personally donated 2 cards, a set of mini cards and matching envelopes, and 2 glass tile pendants.
So please, stop by this amazing seller's shops and see what she has to offer, or convo her and ask to contribute your own bit of good will.
Happy crafting,
~TPE
Monday, August 3, 2009
Upcycle a frame with PAPER!

Hello my lovely crafters and craft enthusiasts!
Today, I thought I'd share my very first tutorial with you. I recently made another upcycled frame, and thought I'd share how I did it. It's SUPER EASY, and proabably doesn't even need a tutorial, but for those of you who are lacking a little crafty inspriation lately, here's to you. ^_^
Alright, first we need to gather our materials.
- an old frame (It works best with frames that are flat, ie. no ridges or anything in the frame design.)
- a thicker scrapbook paper (I used SEI paper, as it's thick and durable, but you can use any thicker patterned paper you wish. Washi origami paper aslo works very well for this.)
- Aleene's Tacky glue
- exacto knife or other craft knife
- cutting surface (I almost forgot this and was about to carve up the table until the boyfriend stopped me, lol.)
- bone folder (not necessary really, but GREATLY helpful!)
- Krylon Triple Thick Clear Sealant or other paper-safe sealer (This will help give more durability to your project and add a glossy finish. ^_^)
Cut the paper larger than your frame, as it you were wrapping a present, making sure the paper will wrap around the frame's sides.
Take your frame and disassemble it, taking off the backing and glass, so that you are left with just the framing. Add Tacky Glue to the front, making sure to cover the entire area, especially the edges and corners. Lie the frame glue side down onto your patterned paper. TRY TO GET IT CENTERED!Let this set a minute or so.
Now, take your exacto knife and cut a small rectangle out of the center of the patterned paper, showing through the frame. Make sure you don't cut to close to the frame's inner edge. You want to be able to cover the frame's inner edge when you wrap the paper around. Once that is done, cut from the corner of the rectangle you just made to the corner of the frame's inner edge. Again, make sure not to cut to close into the corner. Repeat this for all four corners.
Now you should have 4 little 'flaps' inside your frame. Taking the Tacky glue, spread glue one one flap, making sure to get the glue in the crease between the paper and the frame. Fold the flap up to cover the frame and glue firmly. Using a bone folder to help makes this much easier and ensures a tighter fit later.

Once all 4 flaps are glued and have been given a couple minutes to dry, you can begin wrapping the edges of your frame. Start with 2 parrallel sides, as shown. (I started with the two longest sides.) This will help you fold the corners in later. Apply Tacky Glue to one flap, and fold it up to cover the frame, making sure you have pulled the paper snugly against the frame. The tighter you pull the paper to the frame, the better it will look when completed!
 Once those edges have had a chance to sit and dry fairly well, as you don't want them moving around when you fold the other sides, start folding in the other sides. It can be a little tricky, but don't worry. ^_^
I fold the top 'flap' haning over from the other side's flap down and press it against the uncovered frame side, using a bone folder to make sure it is snug. It sounds a bit confusing maybe, but look at the photos to give you an idea of what I did.
when both corners have been tucked in, fold the flap up to cover the frame edge. Make you the fold is tight and snug! Repeat for the last edge and allow to sit and dry for a few minutes.

Well, we're almost done! Turn your frame over and examine for any uncovered areas. It's alright if you have a few the first time. It can take a little practice to know just how to wrap the frame so that nothing shows. It took me a couple tries, too! ^_^
Now that your frame is wrapped, it's ready to be embellished! You can also choose to leave your frame plain wrapped, it's up to you!

I chose to embellish my frame with die cut chicks from my Cricut, adding to it's retro feel. Just use Tacky glue to add whatever you want to the frame and make it yours. ^_^ When you have finished embellishing your frame, add a clear sealant for extra protection. Follow the instructions on the product, and if aerosol, only use in a properly ventilated area or outside! Krylon is really strong and I would only use it outdoors and with a mask on.
Sunday, August 2, 2009
News and The Weekly Feature
Hello again everyone! It's been a little bit since I've updated, hasn't it? Well, I could bore you with the life junk that's kept me away, but what fun would that be? So, let's dive right in to the stuff you're really here for. ^_^
First off, I've been featured in a treasury! Omg! Please stop by trelabela's awesome treasury to check out my Vintage Samsonite Train Case and all the other awesome orange and green items she's showing off. Thanks again to trelabela!
In other news, I just got the most awesome crafting tool known to mankind, The Cricut! I have been crafting away, getting the hang of it, and I absolutely LOVE it! Expect to see Cricut project tutorials and postings of new things I've been working on in the near future!
I am also gearing up for my very first craft show, to be held locally at Common Grounds in Waco, right by the Baylor campus. I have been doing continued research into set up, displays, promo and projects and posts as to that will be forthcoming, so stay tuned for all the news about my journey into craftshow-dom!
Now, on to the WEEKLY FEATURE!
This week's feature is all about BLUE. I sifted through the Etsy-verse to bring you all some of my favorite blue items. I have everything from jewelry to a little home decor, so please check out my sidebar and visit these talented sellers!
Thanks to everyone who shared their items with me, it was a pleasure to feature you!
Happy crafting,
~TPE
Subscribe to:
Posts (Atom)